Friday, 6 June 2014

DIY Leg Chain

I've wanted to own a leg chain since I saw Vanessa Hudgens (LOVE her!) wear one a the Coachella 2012. It's actually sad that I've only gotten around to making one now, but here it is. 
The supplies you will need are pretty straight forward, and you can find most of these stuff at a Michael's or any craft store. 

What you will need:
  • Chain- I actually used 2 necklaces so their was a variety of chain textures. 
  • Elastic- You can find this at any fabric or craft store. You can also use an existing garter.
  • Jump Rings- The sizes depend on the size of the chain you use. 
  • Pins, Needle, and some tread
  • Pliers- the smaller the better, these will help with securing the jumper rings and chain. 
  • Shorts/ Skirt- Chose the ones you will most likely wear with the chain.


STEP ONE: pick your faviorte short and put them on. It's better to pick your shortest pair so that you can measure the elastic at the highest point of your thigh where it will still be hidden under the shorts.


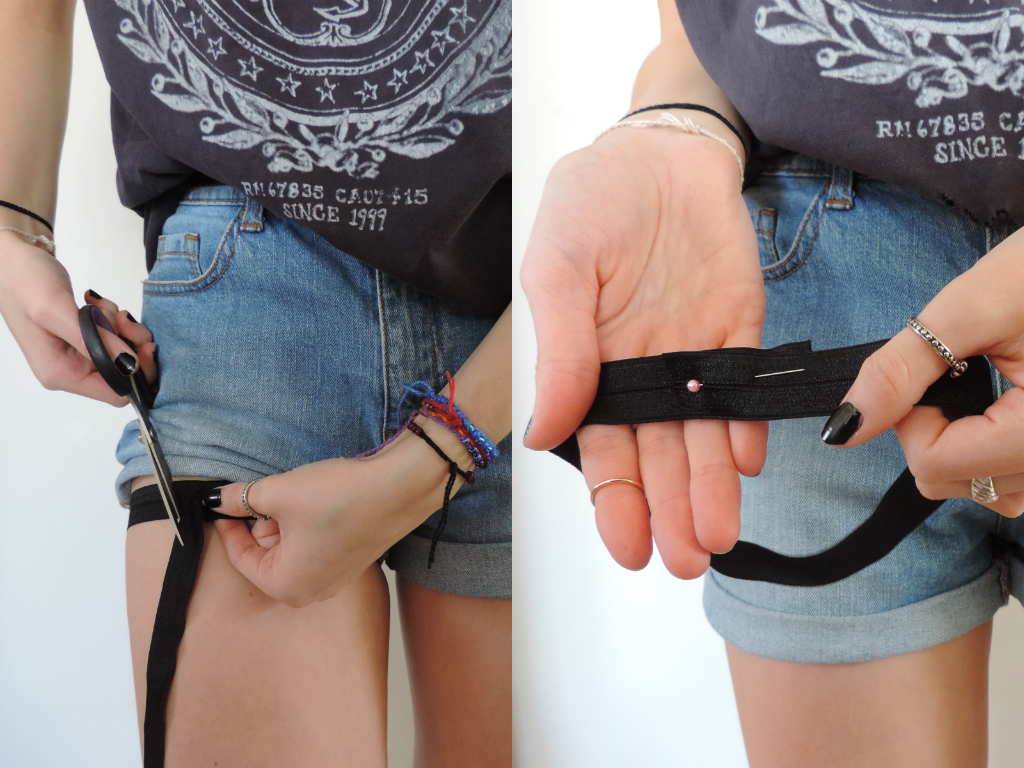
STEP TWO: Measure the elastic at your thighs highest point to ensure that the shorts conceal it well. Leave about an inch of elastic over lapping itself so its easier to sew together. Pin it together and cut off the excess elastic. Sew it together either by hand or using a sewing machine. I find the best way to sew it is in a square; sewing along the top, bottom and the two edges, this helps keep it together when the elastic stretches. 
STEP THREE: Attach a safety pin to the elastic, this will connect the chain to the elastic. As an alternative you could punch a small hole in your elastic and thread a jump ring instead of a of using the safety pin.
STEP FOUR: Using one of the larger jump rings, attach that to the end of the safety pin and the end of your main/middle chain. This chain should reach from the top to the middle of your thigh, so that there is enough space above your knee for the end chains to wrap around. My middle chain was about 5 1/2".
STEP FIVE: Attach the first chain to the end of the middle piece using a jump ring. Wrap it around your leg keeping it loose fitting so that you can move in it comfortably. My bottom chain measured 19". When your happy with your length cut the chain and attach it to the same jumping at the end of the middle piece. 

 You want to repeat these steps for all the other chains. You can add as may chains as you'd like. I chose to only do three. As you move up your leg the length of the chain for each section gets longer. My second chain from the bottom measured at 22" and the top chain was 24". 
The width I left between each chain was about 2".


Hope you enjoyed and have fun crafting!! 
Talk to you soon <3


Tuesday, 3 June 2014

Patches


 Sandal- Urban Outfitters
Hat- Urban Outfitters
Crop Top- Urban Outfitters
Shorts- Thrifted & DIY studs 
Blazer- Thrifted 

I put this together in a hurry last weekend when I went out to do some shopping with my sister. I recently bought both the hat and the sandals during an Urban Outfitters sale and I cant stop wearing them. I even wore the sandals in the rain (which was a  horrible idea) but thats how much I love them. 
I got the blazer during my sisters garage sale, one of her friends let my buy it at a discount (3$) so why not. I wasn't sure how I was going to style it but I think this pairing work out well, especially with this cute cat crop top!! High-waisted shorts and crop tops are going to be all that I wear this summer so it's good to have variations of both to keep outfits interesting.   

I have a DIY coming later this week ! See you soon <3 


Friday, 30 May 2014

Dream Catcher


Bralette- Brandy Melville
Kimono- DIY
Wool Hat- H&M
Necklaces- Forever 21

This kimono is my new spring favorite!! I made it a couple of weeks ago and posted a tutorial here. I was feeling sort of left out being in Toronto and so far away from the festival madness of post Coachella and all the other awesome music festivals to come, so I decided to get dressed up in my festival gear and have my own like outdoor music adventures. 
I love the way pastel colours look with darker ones and adding black leather to a light outfit adds such a nice edge to the feminine aspects of the look. As always I finished the look off with my black H&M fedora and my black lace heels. 

Enjoy your weekend ! See you soon <3


Tuesday, 27 May 2014

DIY Kimono


Kimono's are one of the biggest spring/summer trend of the year. I love them and I love how you can find them in every different style possible, from short or long to
plain or colourful. 
With that I thought it would be a fun DIY to make, and I wanted to make it in the easiest way possible. 

What you'll need:

  • 2 Scarves ( These are from H&M the have many colours and patterns. They are about 60x200cm or  24"x 78")
  • Measuring Tape
  • Pins!! 
  • Basic thread and needle
This DIY is super simple and only took me 20 minutes !


STEP ONE: Lay both scarves side-by-side and fold them in half. I left the top layer about 5" from the bottom which adds more flow to the kimono and also leaves the back of the kimono longer then the front. The top layer measured approximately 35" from the bottom seam of the second layer to the folded edge. 


STEP TWO: Pin the seam of the two back pieces together and sew along the edge, either by hand or machine. 


STEP THREE: The length of each arms hole can be measured by preference. I personal don't like the openings to be to wide. From the top folded edge I measured 12" and placed a pin at that mark, then sewed the sides of the kimono together up until the pin, leaving the 12" opening.   


YOU'RE DONE!!

Have fun making your own kimono! See you soon <3